Chat with robot through phone
This lecture will show you how you can chat with your robot, control it using simple commands, using your phone. You can choose from a variety of options to control the robot different kinds of parts, with a large command set.
Requirements
- An Android phone with version 5.0 (Lollipop) or above
- Integrated Bluetooth chip in your phone
- Lego Mindstorms EV3 Brick
- Ozeki 10 installed on your phone: Installing Ozeki 10 on your Android device
- EV3 Brick paired with your phone using Bluetooth: Bluetooth pairing on Android phones
- EV3 Brick connected to your phone: Connect the Lego robot to phone
Start Control Panel on your phone's browser
You can get the connection info after you start the service on your phone. You can click on the link then sign in with the given username and password. You can get more information about this process in Connect the Lego robot to phone lecture at Task #1. After you have succesfully signed in, choose the 'Control Panel' icon to access the different types of Lego connections.
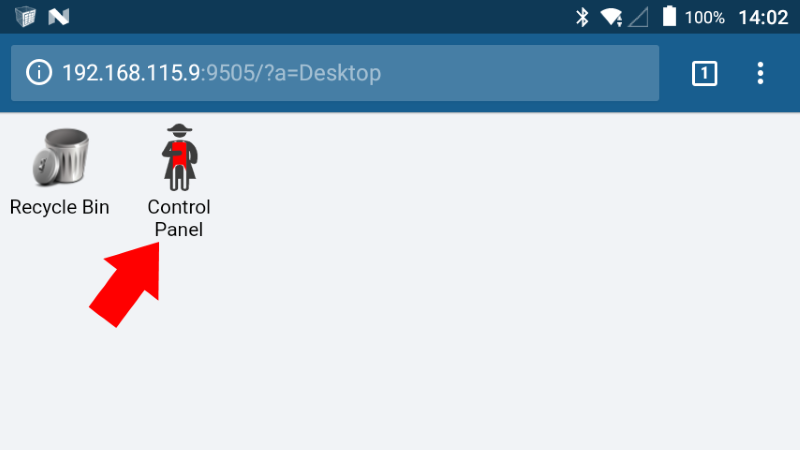
Figure 1 - Choosing Control Panel
Click on the LED connection
On this list you can see your EV3 robot's different connections, you need to filter the connections, in order to see only the Lego connections, you can read more about that in Connect the Lego robot to phone lecture at Task #5. After you have done that, choose the LED connection from the list, as shown at Figure 2, there you will be able to access LED options.
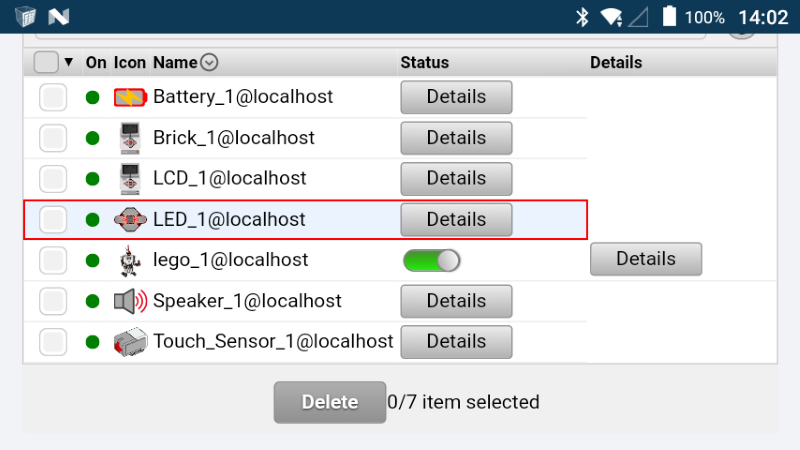
Figure 2 - Selecting LED_1 to control LED
Send command to control the LED through Ozeki chat
In the LED details, if you scroll down a bit, there is a tab called chat, there you will be able to chat with your robot, send commands to it. You can write your message to the 'Type your message here' field then you need to click on the blue 'Send' button to send it, the process can be seen at Figure 3. You can query the full command set with a 'help' command, this will list all the available commands, also describing what they are used for. For example if you send an 'orange' command your robot's LED will change to orange, or you can change it to other colors too.
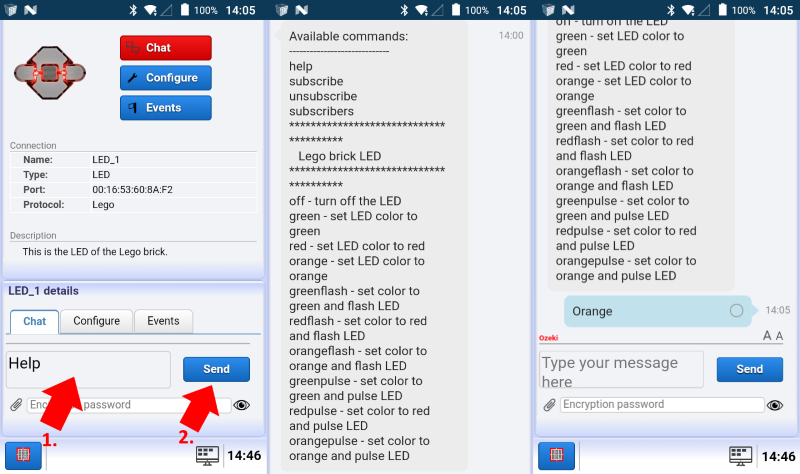
Figure 3 - Sending commands
The Brick Status Light command set
With the listed text commands you can control the LEGO LED effectively from Ozeki 10. The first 'Description' table contain all the commands to control the LED, the 'Command table' control all the basic commands that is gonna help you using this chat funcionality. These messages can be sent from e-mail, SMS or Snap codes, so you can choose from different options.
| Command examples | Description |
|---|---|
| off | turn off the LED |
| green | set LED color to green |
| red | set LED color to red |
| orange | set LED color to orange |
| greenflash | set color to green and flash LED |
| redflash | set color to red and flash LED |
| orangeflash | set color to orange and flash LED |
| greenpulse | set color to green and pulse LED |
| redpulse | set color to red and pulse LED |
| orangepulse | set color to orange and pulse LED |
Commands Table - These commands can controll the LED
| Basic commands | Description |
|---|---|
| help | request the command set |
| subscribe | subscribe to device messages |
| unsubscribe | unsubscribe from device messages |
| subscribers | shows the list of subscribers |
Basic commands Table - General commands for all devices
More information
- How to make an app
- How to make a GPC
- How to make a persistent file
- How to generate and display the QR Code image
- Installing Ozeki 10 on your Android device
- Robot control using SMS
- Robot error alert in SMS
- Build a custom GPC to enhance your Graphical User Interface (GUI)
- Trouble Shooting
- Learn to use browser sensors
- Publish your app and make money
- Bluetooth pairing
- Lego Mindstorms EV3 Bluetooth troubleshooting
- Easily open Ozeki Snap through the GUI
- Open the arm when te object is close
- Bluetooth pairing on Android phones
- Connect the Lego robot to phone
- Chat with robot through phone
- Chat with robot using phone and PC
- How to create Lego robot build instruction
- Mapping and Navigation